


Hello everyone, We are glad to take you through the procedure involved in interfacing an Moisture Sensor with ATmega 16/32 microcontroller board. Moisture sensor can be bought from our online store by clicking here
Hardware Prerequisites:-
- ATmega 16/32 board.
- Moisture Sensor: You can avail this module easily from our online store
- LED array
- AVR USB programmer:-USBasp. This is also available in our online store by clicking here
- CP2102:-USB to TTL serial converter. Avail this from our online store
- Jumper Wires for making connections.
Software Prerequisites:-
- AVR studio for coding and compiling
- AVRdude for burning/uploading hexcode
- PuTTy:- A terminal software.

ATMEGA-16 Features
- ATmega16 is an 8-bit high performance microcontroller from the Atmel’s Mega AVR family.
- Atmega16 is a 40 pin microcontroller based on enhanced RISC architecture with 131 powerful instructions.
- It has a 16 KB programmable flash memory, static RAM of 1 KB and EEPROM of 512 Bytes.
- Most of the instructions execute in one machine cycle.
- It can work on a maximum frequency of 16MHz.
Moisture sensor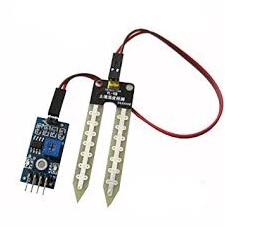
Features
- Detect soil moisture / conductivity of liquids .
- Sensitivity adjusted using blue digital potentiometer in module.
- Operating voltage 3.3V-5V
- Module dual output mode, digital output, analog output more accurate.
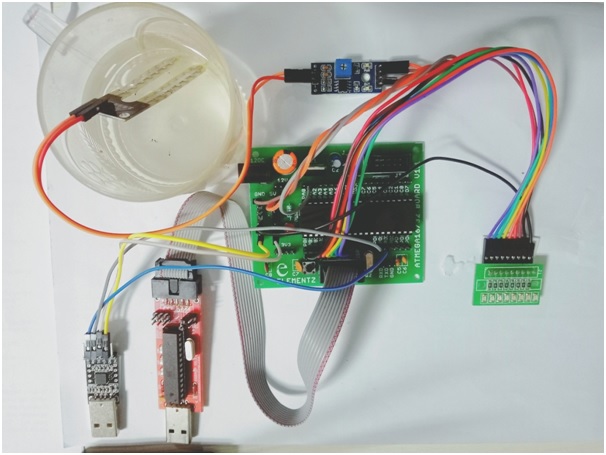
STEP 1: Make clean connections for interfacing Moisture sensor with ATmega 16/32 board by following these pin inter-connections.
| MOISTURE SENSOR PINS | ATMEGA 16/32 PINS |
| V | 5V |
| A0 | PA1 |
| D0 | keep open |
| GND | GND |
Connect led array to PORTB of microcontroller board. Connect its common pin to ground. Also connect CP2102 to ATmega 16/32 microcontroller board as depicted in table below.
| CP2102 pins | ATmega 16/32 pins |
| TXD | RXD |
| RXD | TXD |
| GND | GND |
| 5V | 5V |
STEP 2: Open AVR studio. Copy the program source code along with its attachment libraries and headers. Save and Build the main program source code in AVR studio.

To set board and frequency go to Project>Configuration options in AVR studio. Select device as ATmega16/32 and set Frequency as 8000000 Hz STEP 3: Connect USBasp USB programmer to ATmega 16/32 board. Open AVRdude software. In configuration settings, select ATmega16/32 as microcontroller.

STEP 4: In memories section of AVRdude, browse for hexcode generated for the main source code

STEP 5: Also, check if the write button is ticked. If not ,tick it. After uploading hexcode. Press execute to burn the code into ATmega 16/32 board.

If everything is uploaded perfectly, then if Moisture content is present the led array turns ON. STEP 6: In order to observe serial data available, connect USB to TTL serial converter to a USB port in PC. Open PuTTy. Select Serial button. Also, select the communication port and set baud rate as 9600. Click Open.

If moisture is detected , ‘moisture detected’ appears on screen else ‘normal’ appears on screen.
OUTPUT SCREEN SHOT


PROGRAM CODE
Go through this link.Open atmega16 folder->open adc_test_code-> attach all the libraries to the AVR Studio,upload it to the board.


