


In this project, we are controlling an LED connected to ESP8266 from a desktop application called MQTTLens. The MQTT broker will be running in the same local network. Installation of broker in Windows and Linux OS are also discussed below. This blog post divided by two parts. PART 1 (this link) includes the general discussion about MQTT and installing MQTT Broker named mosquitto broker in a Local PC which acts as the server. The IP address and port used in this tutorial assume that you are installing the mosquitto broker with the default MQTT configuration. PART 2 - (this blog) shows the sample code and expected output of the project described.
Code to publish data to MQTT Broker
#include <EEPROM.h>
#include <ESP8266WiFi.h>
#include <PubSubClient.h>
#include <Wire.h>
const char *ssid = "";
const char *password = "";
const char *mqtt_server = "192.168.1.201";
const char *device_id = "esp8266";
WiFiClient espClient;
PubSubClient client(espClient);
const byte ledPin5 = 16;
char message_buff[100];
void callback(char *led_control, byte *payload, unsigned int length)
{
Serial.print("Message arrived [");
Serial.print(led_control);
Serial.println("] ");
int i;
for (i = 0; i & length; i++)
{
message_buff[i] = payload[i];
}
message_buff[i] = '\0';
String msgString = String(message_buff);
Serial.println(msgString);
if (strcmp(led_control, "esp/led_control") == 0)
{
if (msgString == "1")
{
digitalWrite(ledPin5, LOW); // PIN HIGH will switch OFF the relay
}
if (msgString == "0")
{
digitalWrite(ledPin5, HIGH); // PIN LOW will switch ON the relay
}
}
}
void reconnect()
{
while (!client.connected())
{
Serial.print("Attempting MQTT connection...");
if (client.connect(device_id, "", ""))
{
Serial.println("connected");
client.publish("esp/welcome", “hello from esp”);
client.subscribe("esp/led_control"); // write your unique ID here
}
else
{
Serial.print("failed, rc=");
Serial.print(client.state());
Serial.println(" try again in 5 seconds");
delay(5000);
}
}
}
void setup()
{
Serial.begin(115200);
client.setServer(mqtt_server, 1883);
client.setCallback(callback);
pinMode(ledPin5, OUTPUT);
}
void loop()
{
if (!client.connected())
{
reconnect();
}
client.loop();
}
Client Application – MQTTLens
First, make sure the MQTT server is running. Then, to test the code, just upload it and run it on your ESP8266. Open the Arduino IDE serial console, so the output gets printed.
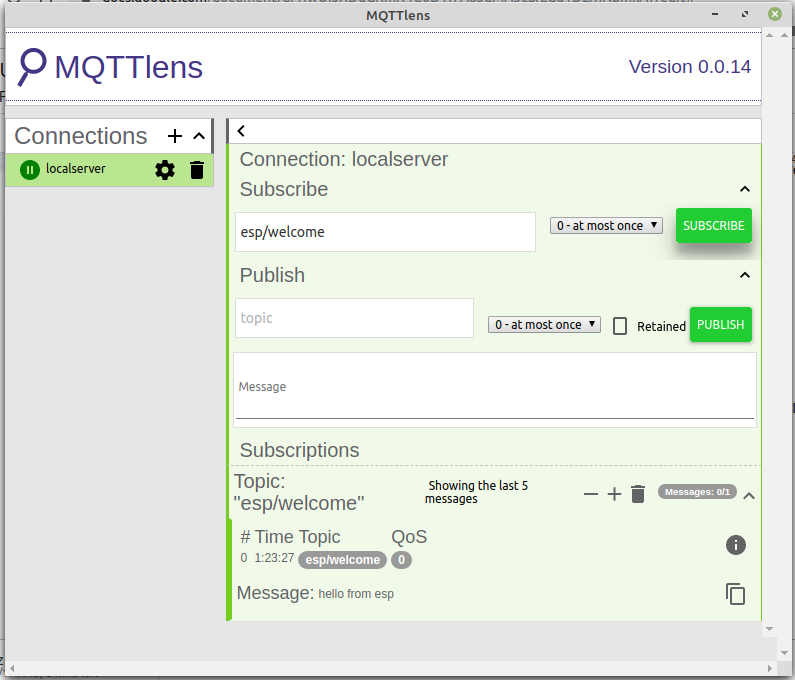
In MQTTLens application, connect to the MQTT Broker using IP and PORT.
Note: Assuming the MQTTLens and Broker are running in same System, one can use 127.0.0.1 as the IP.

In MQTTLens application, subscribe to the topic esp/welcome
Upon running, the ESP8266 will send the “Hello from ESP8266” message, which will not be printed on the serial. After that, the ESP8266 subscribes the same topic to which the hello message was sent.
If any other producer sends a message to the “esp/led_control” topic, then it will be printed in the serial console, as shown in figure 2.
Figure below shows – Messages sent to the “esp/led_control” topic.
MQTT client using Python
Install MQTT client library using the following command.
sudo pip install paho-mqtt
Check whether MQTT server is running using the following command
sudo netstat -l -t
Following programs can be used for testing.
It’s better to assign static ip to your pi, as the ip will be required to configure the devices to connect to your raspberry pi’s MQTT server.
Test_publish.py
'''
Developed By: Dhanish Vijayan
Company: Elementz Engineers Guild Pvt Ltd
'''
import paho.mqtt.client as mqtt
import time
mqttc = mqtt.Client("python_pub")
mqttc.connect("127.0.0.1", 1883) # use the ip of your rpi here
mqttc.publish("esp/led_control", "1") # turn on LED
mqttc.loop(2) #timeout = 2s
time.sleep(2)
mqttc.publish("esp/led_control", "0") # turn off LED
mqttc.loop(2) #timeout = 2s
Test_subscibe.py
'''
Developed By: Dhanish Vijayan
Company: Elementz Engineers Guild Pvt Ltd
'''
import paho.mqtt.client as mqtt
def on_connect(mqttc, obj, flags, rc):
print("rc: " + str(rc))
def on_message(mqttc, obj, msg):
print(msg.topic + " " + str(msg.qos) + " " + str(msg.payload))
def on_publish(mqttc, obj, mid):
print("mid: " + str(mid))
def on_subscribe(mqttc, obj, mid, granted_qos):
print("Subscribed: " + str(mid) + " " + str(granted_qos))
def on_log(mqttc, obj, level, string):
print(string)
# If you want to use a specific client id, use
# mqttc = mqtt.Client("client-id")
# but note that the client id must be unique on the broker. Leaving the client
# id parameter empty will generate a random id for you.
mqttc = mqtt.Client()
mqttc.on_message = on_message
mqttc.on_connect = on_connect
mqttc.on_publish = on_publish
mqttc.on_subscribe = on_subscribe
# Uncomment to enable debug messages
# mqttc.on_log = on_log
mqttc.connect("127.0.0.1", 1883, 60)
mqttc.subscribe("esp/welcome", 0)
mqttc.loop_forever()


