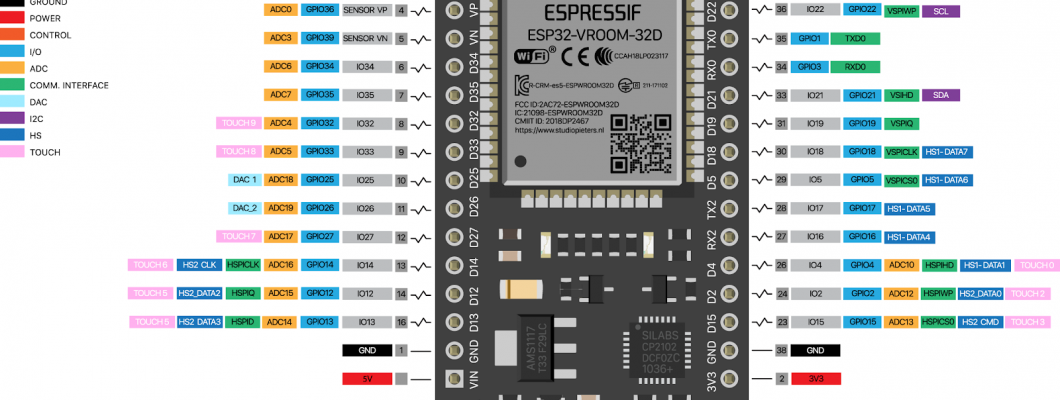
ESP32 is a series of low-cost, low-power microcontrollers with integrated Wi-Fi and dual-mode Bluetooth. It is a successor to the ESP8266 microcontroller. The integration of Wi-Fi, Bluetooth and Bluetooth LE ensures that a wide range of applications can be targeted, and that these modules are truly versatile. All ESP32 Series of modules have a wide operating temperature range of -40°C to 105°C, and are suitable for commercial application development with a robust 4-layer design that is fully compliant with FCC, CE-RED, SRRC, IC, KCC & TELEC standards.
IoT Core is a set of tools to connect, process, store, and analyze data both at the edge and in the cloud. Cloud IoT consists of the device management API for creating and managing logical collections of devices and the protocol bridge that adapts device-friendly protocols (MQTT or HTTP) to scalable Google infrastructure.
In this tutorial we are using an ESP32 module attached with a dht 11 sensor that will send temperature and humidity values to Google cloud IOT platform and the in-built LED of the ESP32 module is controlled from the cloud.
PINOUT
We will be using the built-in LED and push button of the ESP32 module for this tutorial with a DHT11 sensor monitoring the temperature and humidity.
HARDWARE CONNECTION
GOOGLE IOT CORE SETUP
First install the gcloud command line tool for your OS from the link given below.
Now you need to authenticate the GCloud from the cmd tool with your billing enabled account (https://cloud.google.com/billing/docs/how-to/modify-project#enable_billing_for_a_project)
gcloud auth application-default login
Now navigate to the Google Cloud Console
Create a new project and note down the project ID as we need it later on.
Now enable start the Google Cloud Shell Terminal using the button at the top right corner.
Add permission for IoT Core
gcloud projects add-iam-policy-binding <YOUR_PROJECT_ID> --member=serviceAccount:cloud-iot@system.gserviceaccount.com --role=roles/pubsub.publisher
Set the project you created as the default
gcloud config set project <YOUR_PROJECT_ID>
Create a PubSub topic for transfer of data
gcloud beta pubsub topics create <YOUR_PUBSUB_TOPIC>
Now adding a subscription
gcloud beta pubsub subscriptions create --topic <YOUR_PUBSUB_TOPIC> <SUBSCRIPTION_NAME>
Finally create a new registry
gcloud beta iot registries create <REGISTRY_NAME> --region <YOUR_PREFFERED REGION> --event-notification-config=topic=<YOUR_PUBSUB_TOPIC>
ESP32 SETUP WITH MONGOOSE
Start by downloading and installing the mos tool in your PC
Start the mos Web UI window according to your OS.
Before connecting your ESP32 board you need to install the necessary driver for your board.
Silabs drivers : https://www.silabs.com/products/development-tools/software/usb-to-uart-bridge-vcp-drivers
Now connect your ESP32 board to your PC and select ESP32 as the device in mos and also select the port to which your board is connected (Tip: You can use device manager for this)
Now using the “cd” command in the terminal navigate to an appropriate location for your mos projects. Create a new folder and rename it as “app1”.
Clone the demo github repository for mongoose using the command below
mos clone https://github.com/mongoose-os-apps/demo-js app1
The mos terminal will now automatically navigate to the “app1” directory.
Build the app firmware with the command given below
mos build
You can now flash the ESP32 board with the command
mos flash
As the flashing process completes you can see messages appearing in the Serial console of mos.
It is now time to connect your ESP32 to WiFi. For this use the command
mos wifi <WIFI_SSID> <WIFI_PASS>
ESP32 AND GOOGLE CLOUD
To start we have to add the ESP32 module to Google Cloud IoT.
mos gcp-iot-setup --gcp-project <YOUR_PROJECT_ID> --gcp-region <YOUR_REGION> --gcp-registry <REGISTRY_NAME>
You should now see that the ESP32 module is now connected to GCloud.
LED CONTROL
We will now control the in-built LED of the ESP32 board from Google IoT Core by updating the device configuration.
This code subscribes the ESP32 to /config and takes the message in JSON format with the state of the LED.
In your Google Cloud Console with your project selected go to the IoT Core Tab and select the registry you created. Now, go to the Devices tab and select your device. Use the “UPDATE CONFIG” option to send the JSON command in text format.
{"led": 1} // turns on the LED
{"led": 0} // turns off the LED
PUBLISHING DHT11 SENSOR DATA
Now we will obtain the humidity and temperature values from DHT11 and publish the same to /state that can be viewed at Google Cloud Console.
This code snippet finds the ambient temperature and humidity with the connected DHT11 using the DHT js library and then publishes it to the /state topic to be viewed from Google Cloud. From your device windows go to the Configuration and state tab and you can use the reload button to load recent publications from the esp32.

